Proper management of diabetes is when it is taken into practice, keeping tabs on blood glucose levels, insulin dosages, and daily activities. But most people can’t afford all that juggling in life. But the situation changed with the advancement in technology, which has so simplified the management of both Type 1 and Type 2 diabetes. One such development made by Omnipod 5 is a tubeless pump in combination with a smartphone application that enables users to take control of their insulin therapy.
It represents the companion to the Omnipod 5 insulin pump, providing levels of convenience and control that one could not have dreamt of before. Let us explore in this blog what features and benefits Omnipod 5 app for iPhone does offer, how it all works, and how big of a game-changer it is for managing one’s diabetes.
What Is the Omnipod 5 System?
The Omnipod 5 system is one of the most advanced tubeless insulin pumps that comes with the ability to connect with continuous glucose monitoring devices for automated dispensation of insulin. Unlike the usual pumps, the Omnipod 5 has no tubing that would restrict patients’ activities. This automatically adjusts the delivery of insulin as it receives real-time readings of glucose levels, meaning that users can keep their blood sugar levels in the target range without much interference.
How Does the Omnipod 5 App for iPhone Work?
It is relatively easy to use the Omnipod 5 app. Here’s a general overview of how it works:
Install the App: First, download the Omnipod 5 app from the Apple App Store.
Pair the App with Your Pod: After installing, the next step is to pair the app with your Omnipod 5 insulin pump. Pairing is quick and simple and ensures that the app will be able to remotely control the pump.
Synchronize with CGM: To completely optimize delivery, it will require pairing up continuous glucose monitors with the mobile app, where continuous glucose monitoring in real-time serves to regulate insulin therapy adjustment as automatically determined.
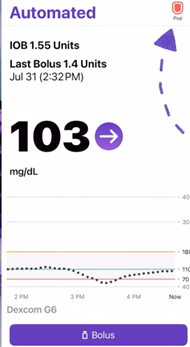
Open the App
- When you open the Omnipod 5 app for iPhone, you get your glucose level right in the middle, like 103 mg/dL
- The insulin on board on the top left is IOB 1.55 units
- You can see the Last Bolus, and what time you did that shows as the last bolus 1.4 units also, mention the date and time
- On the top left, you can see you are in purple automated mode.
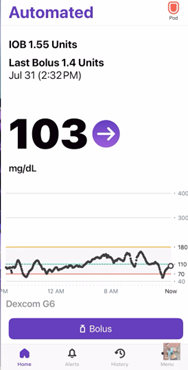
Graph
- The graph shows the Glucose reading that might come from either Dexcom G6, Dexcom G7, or Freestyle Libre 2 plus.
- You can tap on the graph and see the different modes from 3 to 24-hour views of your glucose readings.

- When you tilt your phone over you can then see the same graph and all of the automation information.
- If you tap one of these little red boxes, it will show that your insulin has been paused.
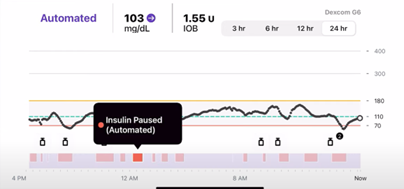
- If you tap the purple area, it’s in automation mode.

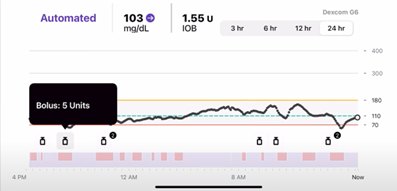
- And these little insulin vials throughout the graph are all the moments where your bolus so you can tap on these and see what type of bolus it was and how many carbs you logged, as shown in the figure below.

- On the main screen in the top right corner, you have a little pod, right now it’s red, typically it is orange.

- The reason why it’s red is you will tap on that it says to change the pod, and that’s because the pod is expiring tonight at 8:19 PM.
- You do get an extra 8 hours of use with Omnipod after the initial 3 days.
- One thing that this app doesn’t do is give you the exact timing, so once it expires at 8:19, it’s just going to say to change out my pod.
- I wish it could have a countdown from 8 hours showing me the amount of time left just because it is easier to digest than do the math of time.
- Besides that, it shows how much insulin is left, if its over 50, we’ll just say 50 plus below 50 it will start counting down.
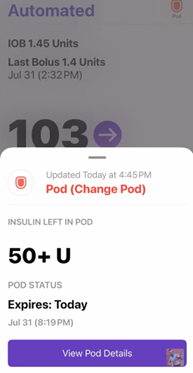
- When you click view pod details, it will show you a little more information.
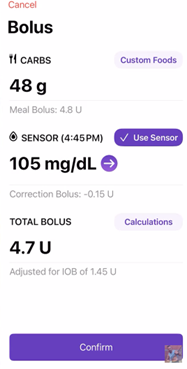
- Back on the main screen you will get this bolus button, when you tap on it, it will show the bolus calculator, this is something you’d be very used to on the Android app or the PDM.
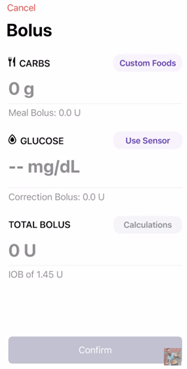
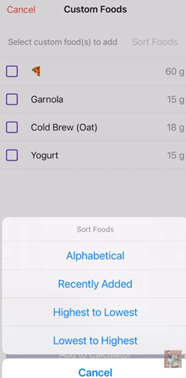
- On the up top, there is a custom foods button. When you tap on it, there are all these different custom foods that you can put in.
- You can also sort foods alphabetically, recently added highest to lowest carb.
- You can also add emojis for the pizza, as you can see in the figure.
- You can select foods that you do for breakfast a lot. For example, you select Cold brew(oat), Granola, and yogurt, and add that food to the calculator.
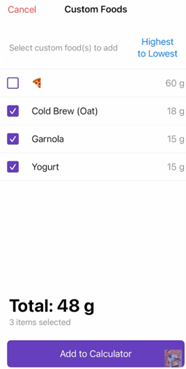
- When you tap on add to calculator, it will add all the carbs of that there. Then you have to press use sensor, and then it will use that data and bolus insulin based on that.
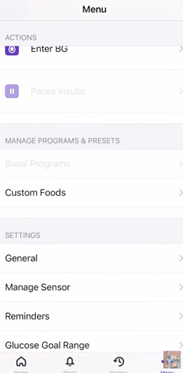
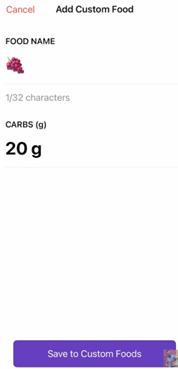
How to add custom Food
- In manage programs and reset, you will see the optionfor custom foods
- Here, you can add custom food. For example, you enterthe food name grapes, you can use an emoji instead and add the carbs how many grams you eat grapes, let’s say it is 20g, then click on Save to custom foods
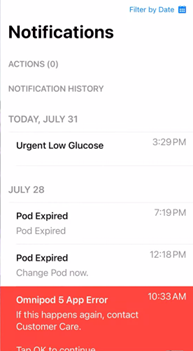
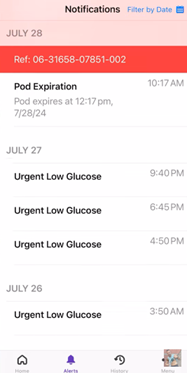
Alert or Notification Page
Back to main page and then select the Alert page, this is where you get different alerts like urgent lows when pod expires, if it had error it will alert. The main alert you can get here is to be pod expired in urgent low glucose. When you get urgent low glucose, that is when you get an alert from the Omnipod app and a sound alert from the pod; otherwise, you will only get Dexcom alerts. This is one where everything sounds, and it’s okay. It’s an urgent low, and it’s probably for the best, especially if your phone is away; you can still get that sound on the Omnipod, and it’s fantastic. You could also filter by date in the top right and choose to see only one date, so if you choose the 30th date, you can see just the alerts from the 30th date.
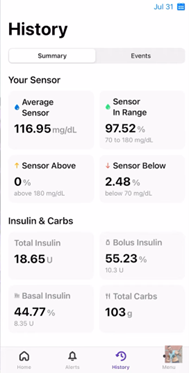
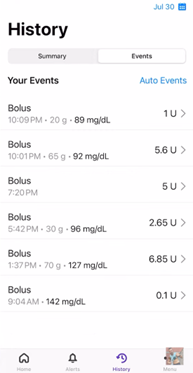
History Tap
- Here, you can see all of the statistics from each day. You can see the sensor in range, Insulin, and Carbs
- You can see your history day by day there, and you can only do it one day at a time here. Whichever date you select, it will show the history of that day.
Events
- Click on the Events tab that allows you to see kind of all of the blousing you have been doing, whether it was based on grams. You can change the day and see your events of glucose level
Menu
- Then let’s go to the last tab, which is the Menu
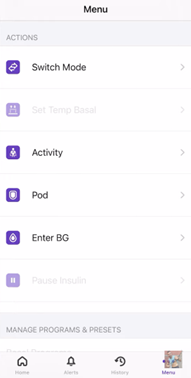
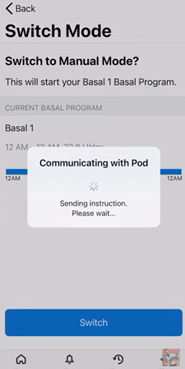
Switch Mode
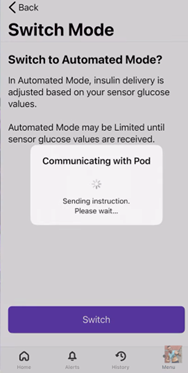
On top, you can see the switch mode. This is to go from automated to manual. By clicking switch mode, it will show you the basal that you have pre-programmed. You can switch, it, and then it will communicate with the pod. When you go to the home page, it will all be blue, which means it has been converted to manual mode.
You can switch it to automated mode, and back to the home screen, you will see all purple, which means it is in automated mode.
Activity Mode
At activity mode you can set your glucose level to 150 milligrams per deciliter, currently you have set to 110 mg/Dl. Then you can set how long you want to go for up through 24 hours
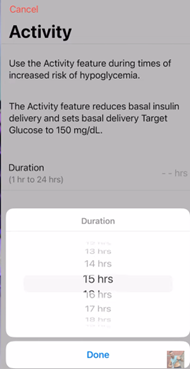
Let’s say you want that with the workout, you need to do more than just set your target range higher through activity features. For intense cardio workout, setting activity mode alone doesn’t quite do the trick, you have to put a temp basil and use manual mode.
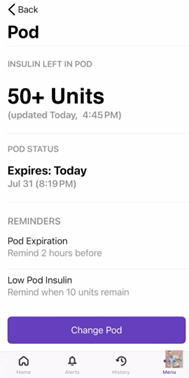
Pod
Clicking on Pod will show the pod information.

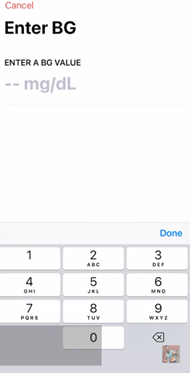
Enter BG
You can get the ability to enter your BG, which is your blood glucose.
Omipod 5 App Compatibility with Dexcom G7 and FreeStyle Libre 2 Plus Sensors
Indeed, the Omnipod 5 App works with Dexcom G7 and FreeStyle Libre 2 Plus sensors apart from Dexcom G6. This allows users to seamlessly integrate real-time glucose data from these sensors with the system so that insulin delivery will automatically be adjusted based on readings from CGM. This integration with the Dexcom G7 also extends benefits to a smaller sensor, a more streamlined, warmer-up time faster; Freestyle Libre 2 Plus also provides reliable glucose tracking with integration into an Omnipod 5 system. This expanded capability increases the flexibility and functionality of the Omnipod 5 for those users desiring or already using more advanced CGM systems.
How to Link CGM to Omnipod 5 application for iPhone
To pair a Continuous Glucose Monitor (CGM) with the Omnipod 5 app on an iPhone, the devices must be compatible, for example, the Dexcom G6, Dexcom G7, or freestyle Libre 2 plus CGM with Omnipod 5. Download the Omnipod 5 app from the App Store and set it up by following the on-screen instructions. Now, following the instructions, you will see how to open the app; go to the “Settings” menu and add your CGM by clicking the “Add Device” or “Connect CGM” option. Once paired, real-time glucose data will be displayed in the Omnipod 5 app, which integrates with the insulin delivery system for automatic adjustments.
Is the Omnipod 5 App for Me?
The Omnipod 5 App for iPhone is suitable for Type 1 or Type 2 diabetes patients who wish to deliver insulin more automatically and hands-off. If you don’t like having an insulin pump attached through tubes and want to control your diabetes from your phone, this system might work for you.
Nevertheless, you should always check with your doctor before making any changes in your insulin regimen or introducing a new system. The doctor can assess whether this Omnipod 5 system fits your health requirements.
Conclusion
The Omnipod 5 App for iPhone is revolutionizing the future of diabetes management. Combining cutting-edge technology with user-friendly features gives anyone who has diabetes powerful ways to automate insulin delivery and stable blood glucose levels. From a new adopter of insulin pumps seeking to simplify their diabetes life or enhance its effectiveness through the introduction of the insulin pump to their daily diabetic management system, the change may just be what your life is missing.
If you’re ready to take control of your diabetes care with a modern, intuitive, and convenient solution, the Omnipod 5 app is worth considering.